This post is a programming tutorial on how to receive MIDI messages on your iPhone, iPad, or Mac using your own code. It includes a code walk-through and a downloadable Xcode project with a complete working example.
Background
On 26 August 2013 I bought a Roland A-88 MIDI controller. I honestly thought I had time to teach myself to play the piano.
Being notoriously curious, I asked myself, “What is MIDI and what comes out of that controller?” Yes, I could have downloaded an app, but…
A year before, I had switched from PC to Mac and was eager to try macOS and iOS development.
A new project was born: MIDI Aid.
https://twissmueller.medium.com/midi-aid-ab4454cfee58
So much for learning the piano.
At that time the app was written in Objective-C and used UIKit. It was hard to find tutorials on CoreMIDI, but I managed to get it done. The first release of MIDI Aid was on 8 February 2014.
The world changed with Swift and SwiftUI— at least my world, and certainly that of many Apple developers. CoreMIDI also got useful updates I wanted to use.
I completely rewrote MIDI Aid in Swift and SwiftUI and released it on 26 November 2020.
It was (and still is) hard to find adequate tutorials on CoreMIDI. With all the changes, many older resources became outdated. There were no complete code examples showing how to receive simple MIDI messages from a controller on iOS, iPadOS, or macOS.
This post fills that gap by providing a code walk-through and a fully working Xcode project.
Compile it for macOS or iOS, plug in a USB MIDI device, and start hitting the keys— or whatever triggers MIDI messages on your device.
When the app receives a MIDI message it will be logged. For now it supports “note on” and “note off” events, but it can easily be extended for other types.
The Xcode workspace with the fully working application can be downloaded from here.
Please note: I did not write the code to handle SysEx messages because I have no means to test them with my controllers.
Prerequisites
A few things are needed to follow this tutorial.
Assume you have some kind of MIDI controller and a way to connect it to your Mac, iPhone, or iPad.
There are three common connection types:
- Classic MIDI cable
- USB cable
- Bluetooth
USB is the easiest because it can be plugged directly into your Apple device. You might need a USB-A to Lightning or USB-C adapter.
If your device does not support USB, use the classic MIDI ports with an adapter cable such as the Roland UM-ONE mk2.
Bluetooth is also an option but requires additional coding for iOS, which I did not include here. Devices like the Roland WM-1 transmit MIDI over Bluetooth.
You also need Xcode. I wrote and tested the code with Xcode 12.5.1.
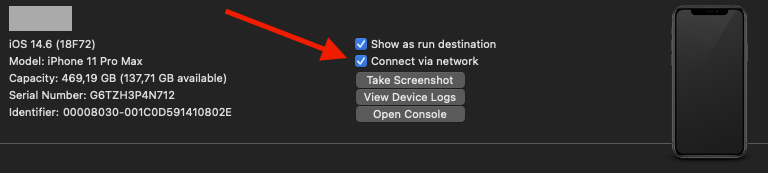
If you wonder how to debug on iOS with a MIDI device plugged into your iOS device: there is an Xcode setting to start the app over Wi‑Fi.
Open Window → Devices and Simulators, select your iOS device, and enable “Connect via network”. From then on, no USB cable is required to run the app on your iOS device from Xcode.
Code Walkthrough
Now for some code. I provide the classes used along with links to Apple’s documentation and quoted descriptions.
Everything starts with a
A client object derives from MIDIObjectRef. It doesn’t have an owning object.
var midiClient: MIDIClientRef = 0
We create this client by calling
Creates a MIDI client with a callback block.
MIDIClientCreateWithBlock("Client" as CFString, &midiClient) { midiNotification in
...
}
This callback is called when something in the MIDI setup changes. When a device is plugged in, it needs to be connected “internally” (explained below).
switch (notification.messageID) {
...
 case.msgObjectAdded:
   NSLog("msgObjectAdded")
   // connect the source, see below
Next we declare a
A port object derives from MIDIObjectRef, and its owning object is a MIDIDeviceRef. It represents an input or output port, and it provides the means to communicate with any number of MIDI sources or destinations.
var inputPort: MIDIPortRef = 0
The port must be created by calling
Creates an input port through which the client may receive incoming MIDI messages from any MIDI source.
MIDIInputPortCreateWithProtocol(
   midiClient,
   "Input Port as CFString" as CFString,
   MIDIProtocolID._1_0,
   &inputPort) { [weak self] eventList, srcConnRefCon in
...
}
We then work with eventList, which is an UnsafePointer<MIDIEventList>. This is the MIDI data to extract.
A variable-length list of MIDI event packets.
From there we parse the MIDI messages:
let midiEventList: MIDIEventList = unsafePointerMidiEventList.pointee
var packet = midiEventList.packet

(0..< midiEventList.numPackets).forEach { _ in
...
}
In the loop we extract the packets:
let words = Mirror(reflecting: packet.words).children
words.forEach { word in
 let uint32 = word.value as! UInt32
 guard uint32 > 0 else { return }
 midiPacket = MidiPacket(
  first: UInt8((uint32 & 0xFF000000) >> 24),
  second: UInt8((uint32 & 0x00FF0000) >> 16),
  third: UInt8((uint32 & 0x0000FF00) >> 8),
  fourth: UInt8(uint32 & 0x000000FF))
}
What isn’t clear to me is the number of packets (numPackets). In my observations, pressing a key produces one packet, releasing it produces another, and so on.
Maybe SysEx messages produce multiple packets because they can be variable length.
Finally, we connect the sources.
First get the number of sources with
Returns the number of sources in the system.
let sourceCount = MIDIGetNumberOfSources()Iterate over each source index to retrieve the source with
Returns a source in the system.
var source = MIDIGetSource(sourceIndex)Then connect each source by calling
Makes a connection from a source to a client input port.
MIDIPortConnectSource(inputPort, source, &source)I put the source-connection code in a separate function and call it twice: once at startup after creating the MIDIClientRef and MIDIPortRef, and again whenever a new device is plugged in.
Conclusion
Hopefully this tutorial helps you implement your own CoreMIDI-based code.
We covered connecting a MIDI controller to a Mac, iPhone, or iPad; setting up the relevant structures in code; and displaying the received MIDI messages. There are many more use cases— you can also generate MIDI messages from code to control other devices. Maybe I’ll write another tutorial in the future, but first I should probably learn to play the piano.
If anything is unclear or you have trouble implementing a specific use case, feel free to leave a comment.