Barcodes are everywhere and, thanks to Apple’s extensive frameworks, we have everything to make barcode processing an easy task. This article provides everything needed to include barcode scanning in an iOS application based on SwiftUI.
Apart from being a SwiftUI application, two other frameworks are used in this tutorial.
First, there is AVFoundation, which is described in Apple’s developer documentation as follows:
Work with audiovisual assets, control device cameras, process audio, and configure system audio interaction.
Second, we are going to use the Vision framework:
Apply computer vision algorithms to perform a variety of tasks on input images and video.
This article will walk through all the steps to wire up the relevant classes to have a SwiftUI application that displays the scanned barcode.
The Xcode workspace with the fully working application can be downloaded from here.
See the app in action:
Application Architecture
First, I will provide a quick overview of all the classes created in this application.
Below is a basic class diagram showing all relevant elements.
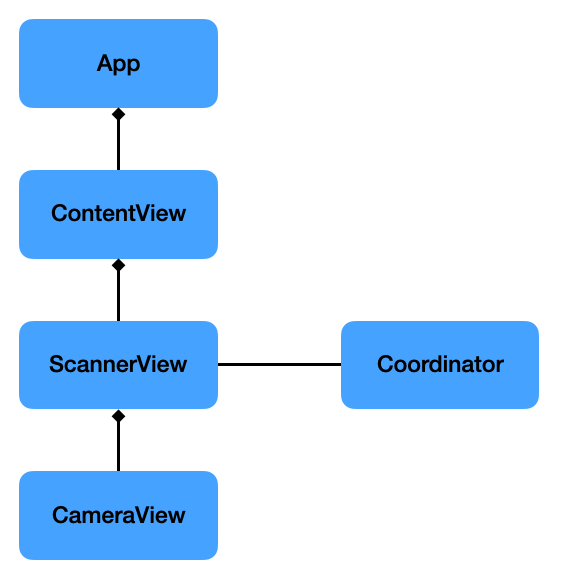
App: This is the basic app template as created by Xcode and has been left as is.
ContentView: Holds the ScannerView and the Text that displays the scanned barcode result. It has a @State variable that is passed into the ScannerView (see below) and updates the Text automatically when it changes. You just got to love SwiftUI.
ScannerView: There is no native SwiftUI view that does what we want, so we need to wrap a UIView that shows our camera’s video feed in a UIViewRepresentable, as I explained in my article “Using UIView and UIViewController in SwiftUI”. This view exposes the scanned result via its @Binding variable to its parent view.
CameraView: This is the UIView that is wrapped by the ScannerView mentioned above. It wraps an AVCaptureVideoPreviewLayer, which is the layer that shows what is being captured by the built-in camera of the iPhone or iPad.
Coordinator: This class is part of the UIViewRepresentable and handles most of the work. First we ask for camera permission, then we set up a pipeline to grab the camera’s output, and finally we feed it into the code that does the barcode recognition.
Ask for Camera Usage
In order to use the camera the “Camera Usage Description” needs to be set in the Info.plist first.

Later, when the app is started for the first time the following will pop up asking the user for permission to use the camera.

In the code, we ask for permission with
AVCaptureDevice.requestAccess(for:.video)Setting up the Camera Feed
Now that we have access to the camera, we can set up the pipeline for getting the video frames which can then be fed into the algorithm for extracting the information in the barcode.
These are the elements we need along with a description as provided by Apple:
AVCaptureDevice- A device that provides input (such as audio or video) for capture sessions and offers controls for hardware-specific capture features.
AVCaptureDeviceInput- A capture input that provides media from a capture device to a capture session.
AVCaptureSession- An object that manages capture activity and coordinates the flow of data from input devices to capture outputs.
AVCaptureVideoDataOutput- A capture output that records video and provides access to video frames for processing.
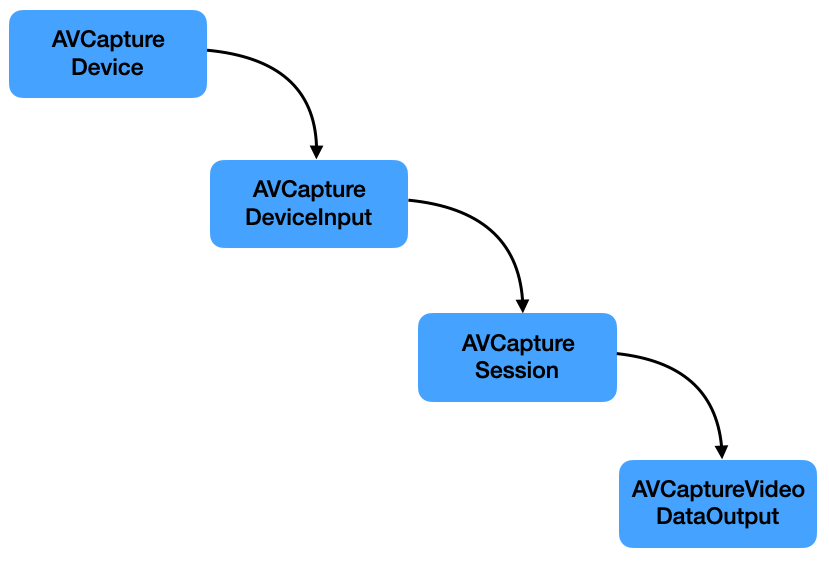
Whereas the AVCaptureSession is central in gathering and processing the necessary video frames, what we are ultimately interested in are the video frames themselves to run the barcode detection algorithms on.
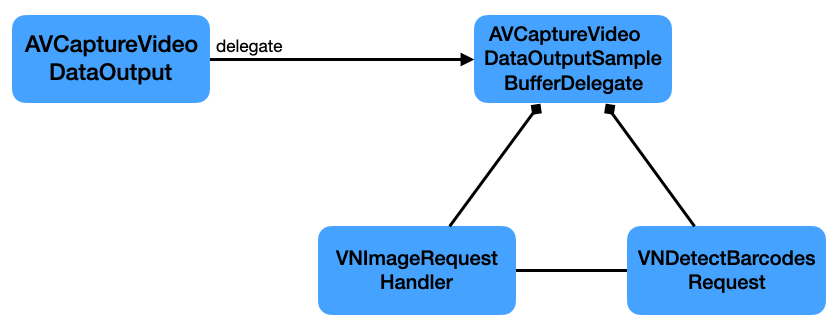
The AVCaptureVideoDataOutput has a delegate which receives the captured output and the buffer with the samples.
Our Coordinator will act as this delegate by inheriting from AVCaptureVideoDataOutputSampleBufferDelegate and implementing captureOutput(_:didOutput:from:).
Processing the Captured Image
One more step is needed to receive the barcode information: processing the images received from the phone’s camera.
There are two classes mainly responsible for that:
VNImageRequestHandler- An object that processes one or more image analysis requests pertaining to a single image.
VNDetectBarcodesRequest- An image analysis request that finds and recognises barcodes in an image.
This is how they work together:
When instantiating the VNDetectBarcodesRequest we need to provide a handler that processes the result.
let request = VNDetectBarcodesRequest(completionHandler: self.barcodeRequestHandler)This handler then receives the observed result which we can process further and extract the final String:
func barcodeRequestHandler(request: VNRequest, error: Error?) {
 guard let results = request.results as? [VNBarcodeObservation],
   let payloadStringValue = results.last?.payloadStringValue else {
  return
 }
 self.scanResult = payloadStringValue
}
Conclusion
In this post I outlined what ‘s necessary to create a SwiftUI app that scans barcodes.
The Xcode workspace with the fully working application can be downloaded from here.