We all know it: It ‘s too late to back up your files after your hard drive has crashed, right?
I had to learn that one morning when I left my wife’s computer on while installing Xcode overnight. She had all her vacation photos on that machine and never made any backups. Somehow the system just froze. After switching it off and on again it wouldn’t boot.
Took the machine to the store where she bought it, but everything was gone. No files were left. The solution: buying a new hard disk, an external case for the old drive and Data Rescue 3. After installing the new hard drive and installing the OS and Data Rescue 3, I plugged in the old drive via USB and was able to recover all those nice vacation images. Thank you, Rescue 3!
What I learned: It was time for a solid backup strategy— and to stick with it!
My Backup Landscape
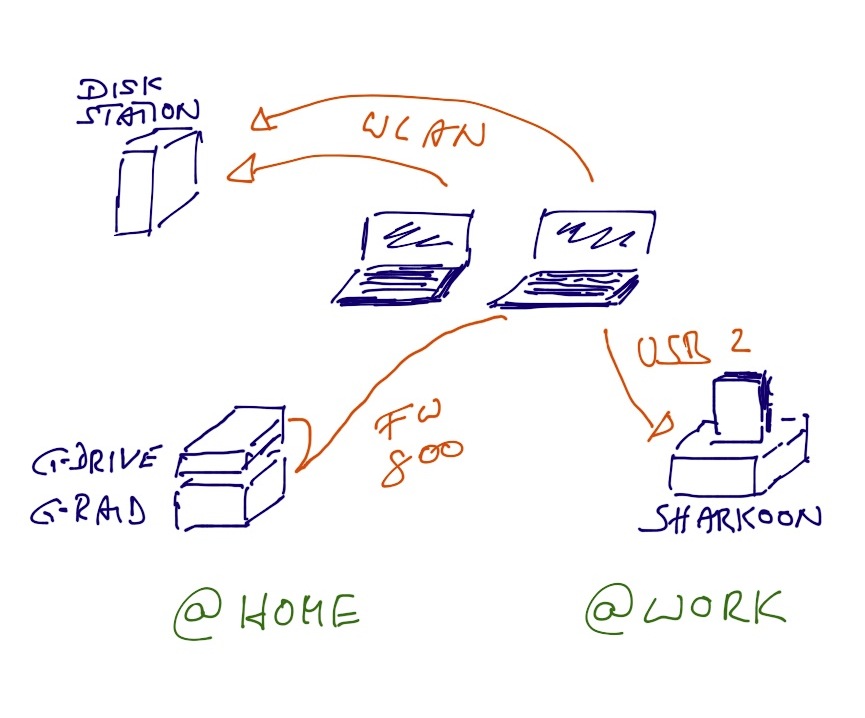
Over the last couple of months a lot has changed. Got lots of new disks and another MacBook from work.
TimeMachine and Synology
First thing I got was a Synology DiskStation DS211j with two 500GB drives in RAID1 mode. Together with Time Machine it is as easy as eating a piece of cake for continuously backing up your systems over WLAN.
Sharkoon
Usually, there is not much time left when coming home from work, bringing the kids to bed and then finally calling it a day. There are days when I don’t turn on the computer at home and therefore would not have a backup.
I had a few “leftovers,” an external housing from Sharkoon and a 500GB disk. I brought them to work and am using it with Time Machine there now. Time Machine has a very cool feature to encrypt the whole drive— a must in spaces where you cannot control who has access to your stuff.
G-RAID and G-DRIVE
At home, I was using the DiskStation not only for Time Machine but also as a “working disk” for my photography projects. Pictures from my digital camera can take up to 20MB each. Using WLAN is not the right solution here, since it is way too slow.
I needed something fast and reliable. My final choice fell on the G-RAID 2TB, which I initially set to RAID1 mode. That left me with 1TB. Although it is possible to use them in RAID1 mode, their support told me I shouldn’t for the simple reason that you have no way of checking if one of the drives failed.
Finally, I set them back to RAID0 mode and got a 2TB G-DRIVE that is daisy-chained with the G-RAID. The G-RAID is my working disk and I mirror it to the G-DRIVE using rsync when I am done with work.
Although I easily could have used the G-RAID and the G-DRIVE as a RAID1 cluster, I didn’t, since I would have lost the speed advantage of the G-RAID over the G-DRIVE. That is the reason why I mirror with rsync.
RSync and MacOS
Some configuration had to be done on my MacBook to get rsync in a mode that made sense. Lots of files are created on external hard drives by macOS that I did not want mirrored to my other drives. In the table below you will find the file or directory that should be removed, and the second column shows how to do it.
| What’s there? | How to get rid of it? |
|---|---|
.Spotlight-V100 | Remove directory .Spotlight-V100 and place a file named .metadata_never_index in /Volumes/<your_drive> |
.Trashes | Remove directory .Trashes and place an empty file .Trashes in /Volumes/<your_drive> |
.DS_Store | defaults write com.apple.desktopservices DSDontWriteNetworkStores true |
.fseventsd | Remove everything in that folder and place a file no_log into it |
.apdisk | ? |
.TemporaryItems | ? |
As you see in the last two rows, I have no idea how to disable the creation of those. Wasn’t able to find the right info on the web. I have added them to the list of files that get excluded during the sync process, the topic of our next section.
The Procedure
Whenever I am done with working on my G-RAID, I run the following script to mirror everything to the G-DRIVE.
#!/bin/bash

source_directory="/Volumes/ACTIVE/"
destination_directory="/Volumes/ARCHIVE"

if ([ -d "$source_directory" ] && [ -d "$destination_directory" ]); then

 find $source_directory -name.DS_Store -exec rm -f {} \; -print
 rsync -av $source_directory $destination_directory --exclude=".VolumeIcon.icns" --delete-after

fi
Actually it does the following:
- It checks if all my drives have been plugged in.
- It removes all
.DS_Storefiles that I might have copied from my local hard drive. - It mirrors the
source_directoryto thedestination_directory.
The --delete-after option causes files deleted in the source_directory to also be deleted in the destination_directory after all other files have been transferred.
With the --exclude-from option, I ignore the files listed in the txt file. Among those are the ones that are created by macOS and also the little icon of the drive that gets displayed on the desktop.
The exclude list looks as follows:
.VolumeIcon.icns
.Spotlight-V100
.Trashes
.DS_Store
.fseventsd
.apidisk
.TemporaryItems
The Future
As always, there is room for improvement.
Off-site backups
Easy! At some stage I will get another drive that I will mirror all my data to from my G-RAID. It will stay in the office for example for two weeks; I’ll bring it home afterwards, transfer the data and bring it back to the office and lock it up there again.
Update 2013-01-02: Finally, I implemented off-site backups using CrashPlan in my post “Off-Site Backups with CrashPlan”.
Stronger distinction between working drive and archive
Although it has 2TB, its free capacity is decreasing week by week with every new picture I take or video I get from iTunes. But at no point will I really need 2TB of data to “work” with. Actually much less would do.
A real archive with data that I only need occasionally could be much slower. A cheap RAID1-capable housing would do, with the option of changing hard drives as I need them. This would also be a cool solution for off-site backups, where you just swap drives in and out at will and take them wherever you want.
Automating RSync
Doing everything manually is no good. Humans forget things; scripts don’t. This should be no problem at all since there is cron. One thing I need to check when triggering it via cron is to ensure it is not still running from a previous call.
Incremental Backups
What if I accidentally delete a file on my working disk and then sync it with my archive? Yep, it’s gone forever. Actually, I am talking about archiving here all the time and not backups!
I found the following two pages on the web that look very promising:
Resources
Thanks to the many resources on the web I was able to improve my backup strategy step-by-step. Check them all out!
- .Trashes,.fseventsd, and.Spotlight-V100
- How to prevent.DS_Store file creation over network connections
- How To disable Time Machine’s MobileBackup
Done for today.